Howdy fellow teachers!
I have a couple lessons on
vocabulary that I have “polished” during the years until I felt comfortable
teaching them. Like everything related to reading and language arts, perfection
means repetition, it took me a while to figure this out (duh, I know!) but now that I finally got it, I’ve got these
lessons among my favorite to teach. I separate them in 3 stages: introduction,
mastering, extension. Then I put a laminated version in Centers.
STAGE 1: INTRODUCTION
The lesson starts with a game
of what I call“WHO HAS MY OPPOSITE MATCH" to get the students 100% engaged. I give each student a card with a word
of opposite meaning, for example, I give the word UP to student 1 and DOWN to
student 2 and so on. I tell the students that they have about 2 minutes to find
the classmate who has a word that means the opposite than theirs. When they
find their partner they have to meet me in the rug where everyone will share
their pair of antonyms. I have a premade set of bilingual antonym cards on TPT
but if you prefer, you can make your set on index cards or post its, another
option for those of you who use Istation, there is one set of antonyms in
Spanish on the teacher resource section. Whatever resource you prefer, I always
recommend that you laminate your resources and put them in centers once they’ve
been introduced, this will help your students practice and reinforce concepts.
Once the kids are in the
carpet, take the time to create an Anchor chart, start with the title and
definition then list all the examples they collected (if you used post-its,
this is a great time to post them in the chart by calling the kids to stick
each one). It doesn’t have to have all the antonyms in the world at that
precise moment; not only will it take forever but it will also be ineffective.
Once you have introduced this concept post this chart in a place of easy access
and fill it out throughout the year as the kids discover more antonyms, IT’S OK
TO KEEP ADDING ON! I also give them a Reference
Antonym Sheet that students glue on the back of their journals in order to
write every antonym that we find during the year. They will use It later on as
part of their self-learning.
STAGE 2: MASTERING (DAYS 2 TO 4)
DAY 2
STAGE 2: MASTERING (DAYS 2 TO 4)
DAY 2
The next day you REFRESH
student memory about Antonyms using your anchor chart and give some additional
examples as a class (some students will have gotten the concept by now),at
that moment they can cut and paste some antonyms in their journal. This
independent activity will allow them to reinforce the concept based on a
similar activity to that of the previous day. Some kids will remember about the
reference sheet, it is ok for them to add these antonyms to the back of their
journal.
 |
| Cut and paste activity in Antonym Packet from my store on TPT. |
On day 3, tell your students
that antonyms are OPPOSITES, then ask the students to share some of the
antonyms they’ve found so far. They can use any of their resources so far: 1)reference sheet 2) antonym cut and paste activity in their journal or 3) the classroom anchor chart, it really doesn't matter, the important thing is that they share confidently (most of your class
should be familiar with antonyms by now). Make sure that you tell the kids
before sharing that they are not allowed to repeat any pair of antonyms, this
will make them be slightly more focused on what their classmates say. After the
quick review, have your students practice again, this time they will have to
pair antonyms from a word bank.
 |
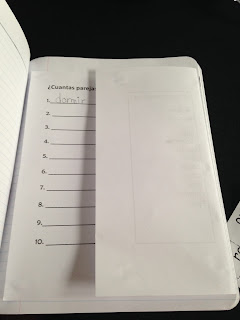
| Pair the Antonyms Activity with Word Bank included in the Antonym Packet from my TPT store |
 |
| Keep it in their journals folded like this to avoid having paper flying everywhere. |
Ok by now ALL your class
should have gotten the concept but if there are 2 or 3 who haven’t, then pull
them to your small group table to provide antonym intervention during Center
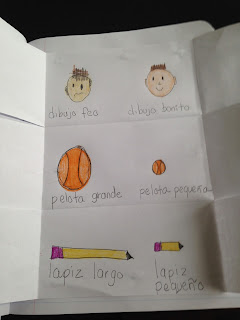
Time. There you can re-explain the concept and slow down. This day they can do
a foldable where they write and illustrate about 3-4 pairs of antonyms that
stuck to their heads. You may think that 3-4 pairs are a small quantity of antonyms
to work on but take into consideration that they will explain the meaning of
the words. Now, that can be way more rigorous that just listing words because
they basically have to explain what they learned and it gives you the opportunity
to look for misconceptions. If you want to add even more rigor have them write
a small sentence or tag under the illustration. THEY WILL LOVE THIS PART!
Day five is a good day for
testing before extending this lesson to the next level. Assessing a skill
always gives me a sense of where I’m at as a teacher because it is important to
get a good idea of how many kids have mastered a concept in order to be
successful explaining something more demanding. You can use my assessment in
the Antonym packet on TPT or you can use what comes with Journeys/Senderos or
your particular reading program. Also,if you are familiar with All In Learning, you can turn any assessment into a fun test by adding the questions as slides and having kids answer with the clickers.
EXTENSION (DAYS 6 AND 7)
DAY 6
On the 6th day of
this lesson, you will take to the next level. After repeating finding pairs for
so long this part shouldn’t be that hard. The purpose is giving them a sentence
with a word that doesn’t make sense and then find the antonym to fix it so that
it sounds right. You can decide whether to give them answer choices or have
them figure it out. I like to give them choices first then I let go. For
example:
Down in the sky I saw many clouds.
(up
near left)
Abajo en el cielo vi muchas nubes. (arriba cerca izquierda)
Then continue with more, I use my own material but you can always create your own. I
always do a couple with them then they go off on their own.
Don't you love it when your
students have an AHA moment and start connecting vocabulary to their own lives?
I DO! It is extremely rewarding when kids start “playing with words” and seeing a relationship
between words everywhere. Well, a little bit of that will happen during this
stage. This activity is about replacing words in a paragraph with an opposite to
make a Funny
Paragraph. For kids with a sense of comprehension and fluency this
activity could be rather entertaining because the story won't make sense, for others it could be confusing so small group could be recommended. The paragraphs I use look something like this, they scratch the underlined word and write the opposite on top:
After this exercise it will be like magic! They will see antonyms in their reading and it will be easier for your little ones to understand what you are talking about when you ask vocabulary questions about a certain text.It will almost be natural!
If you would like to get my 7 days of Antonyms Packet visit my TPT store and enjoy! I'd be glad to know how this worked in your classroom. Please share!
https://www.teacherspayteachers.com/Store/Mrs-Andazola


No comments:
Post a Comment